This n8n webhook tutorial builds an endpoint you can test from your own computer, validate inside n8n, and move to production without the usual “it worked once and then died” confusion.
We’ll create a POST endpoint for a fictional order event. The workflow will accept JSON, keep only the fields we trust, reject requests without an event ID, and return a controlled JSON response. No external app account is required—you can send the test request with curl or Postman.
{"received":true,"eventId":"evt_1001"}.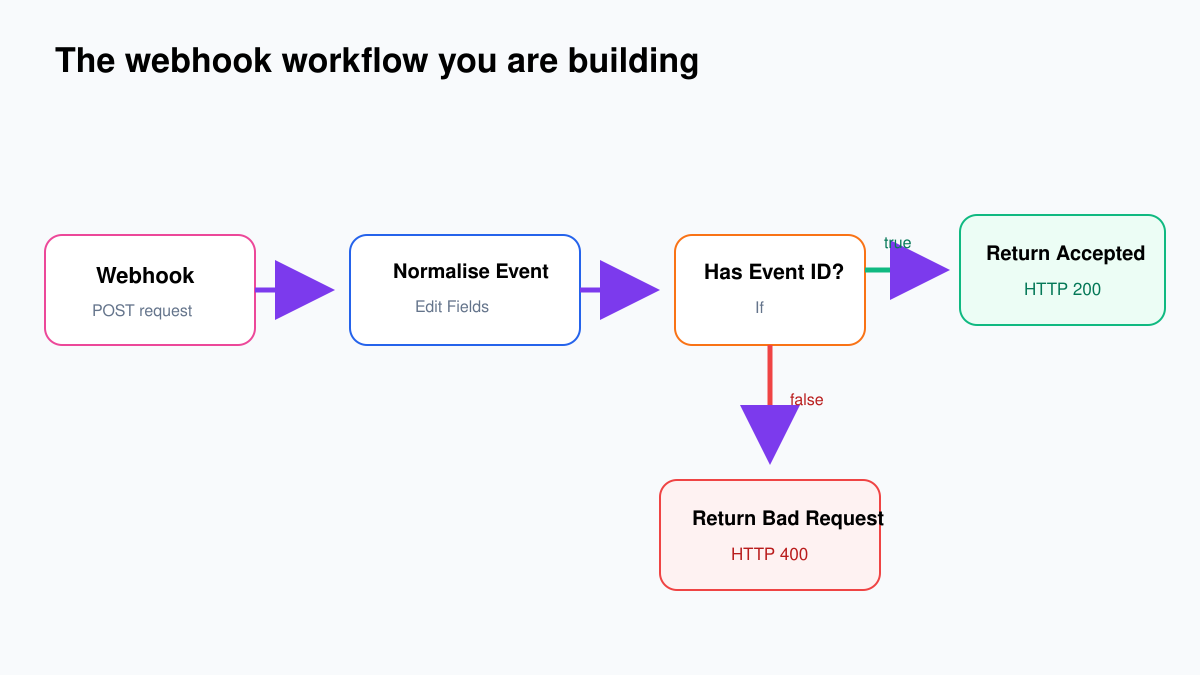
Step 1: Create the Webhook trigger
- In n8n, click Create Workflow.
- Name it Order Webhook Practice.
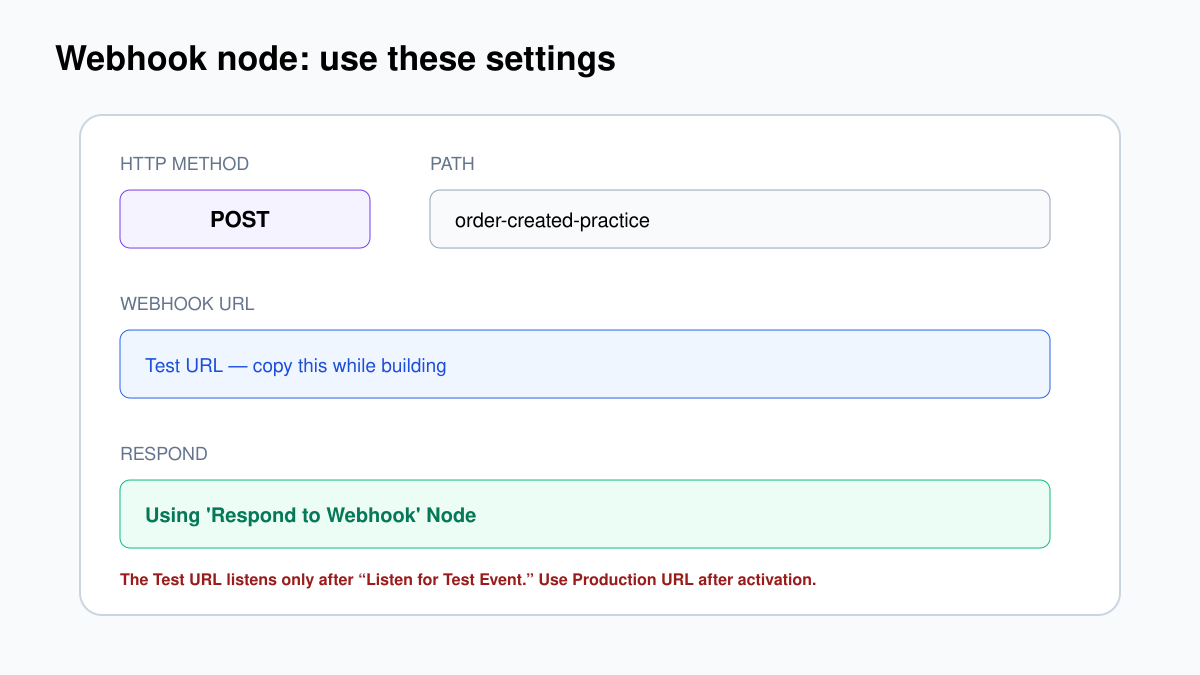
- Click Add first step, search for Webhook, and select the Webhook trigger.
- Set HTTP Method to POST.
- Set Path to
order-created-practice. - Set Authentication to None for this first local test only.
- Set Respond to Using ‘Respond to Webhook’ Node.
The node shows two addresses near the top: Test URL and Production URL. Copy the Test URL for now. In current n8n versions, the test endpoint listens only after you click Listen for Test Event or execute the workflow manually. The production endpoint is registered when the workflow is published or activated.
Step 2: Send a real test request
Click Listen for Test Event. Keep that n8n window open. Then open Terminal, PowerShell, Command Prompt, or Postman.
Replace YOUR_TEST_WEBHOOK_URL with the Test URL copied from n8n:
curl -X POST "YOUR_TEST_WEBHOOK_URL" \
  -H "Content-Type: application/json" \
  -d '{
    "event_id": "evt_1001",
    "event_type": "order.created",
    "customer_id": "cus_42",
    "amount": 129.90,
    "currency": "USD",
    "debug_note": "this field should be discarded"
  }'
On Windows PowerShell, curl can sometimes map to a different command. If the example behaves strangely, use curl.exe instead.
When n8n receives the request, click the Webhook node’s output and select JSON. The received item normally contains these top-level objects:
headers— request headers such as content type.params— variables captured from the URL path.query— query-string values.body— the JSON payload we sent.
That means the event ID is not $json.event_id. It is inside the body: $json.body.event_id. This small detail causes a surprising number of broken webhook expressions.
Step 3: Normalise the incoming payload
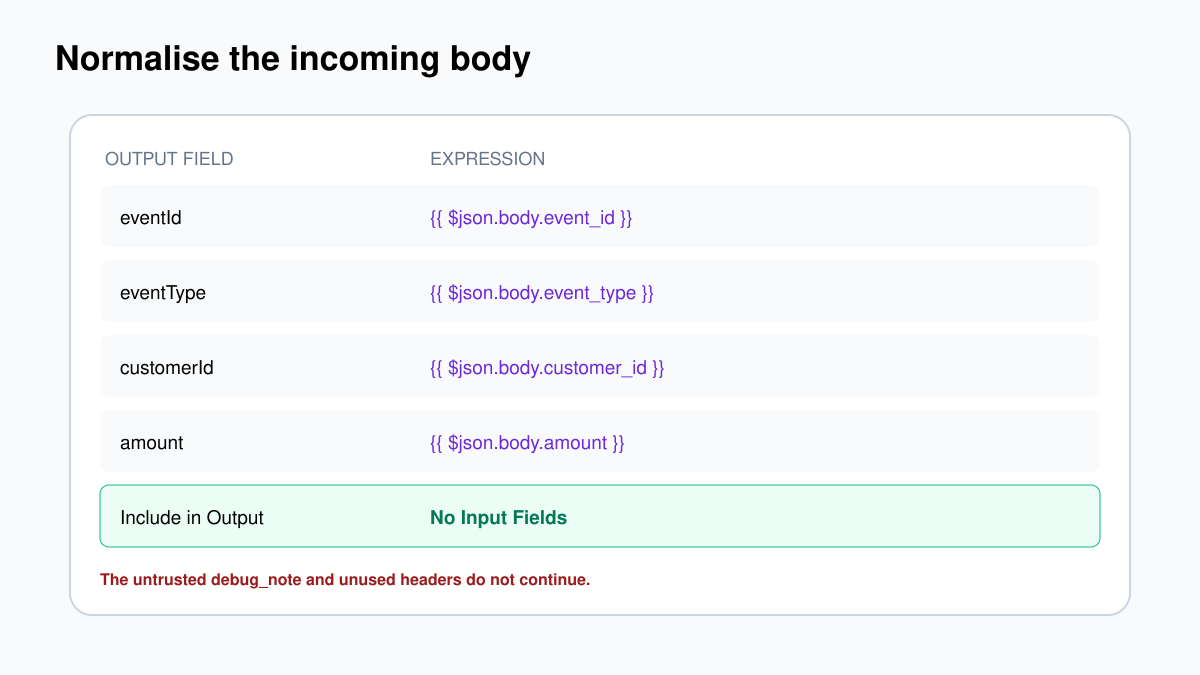
Never let the rest of a production workflow depend directly on every field an outside service happens to send. Create a small internal object first.
- Add Edit Fields (Set) after Webhook.
- Rename it Normalise Event.
- Set Mode to Manual Mapping.
- Add the following fields. Switch every Value to Expression.
| Output name | Type | Expression |
|---|---|---|
eventId |
String | {{ $json.body.event_id }} |
eventType |
String | {{ $json.body.event_type }} |
customerId |
String | {{ $json.body.customer_id }} |
amount |
Number | {{ $json.body.amount }} |
currency |
String | {{ $json.body.currency }} |
Set Include in Output to No Input Fields. On older interfaces, turn on Keep Only Set Fields. Execute the node. The output should contain the five fields above, but not debug_note, headers, query values or the full original body.
Step 4: Reject a missing event ID
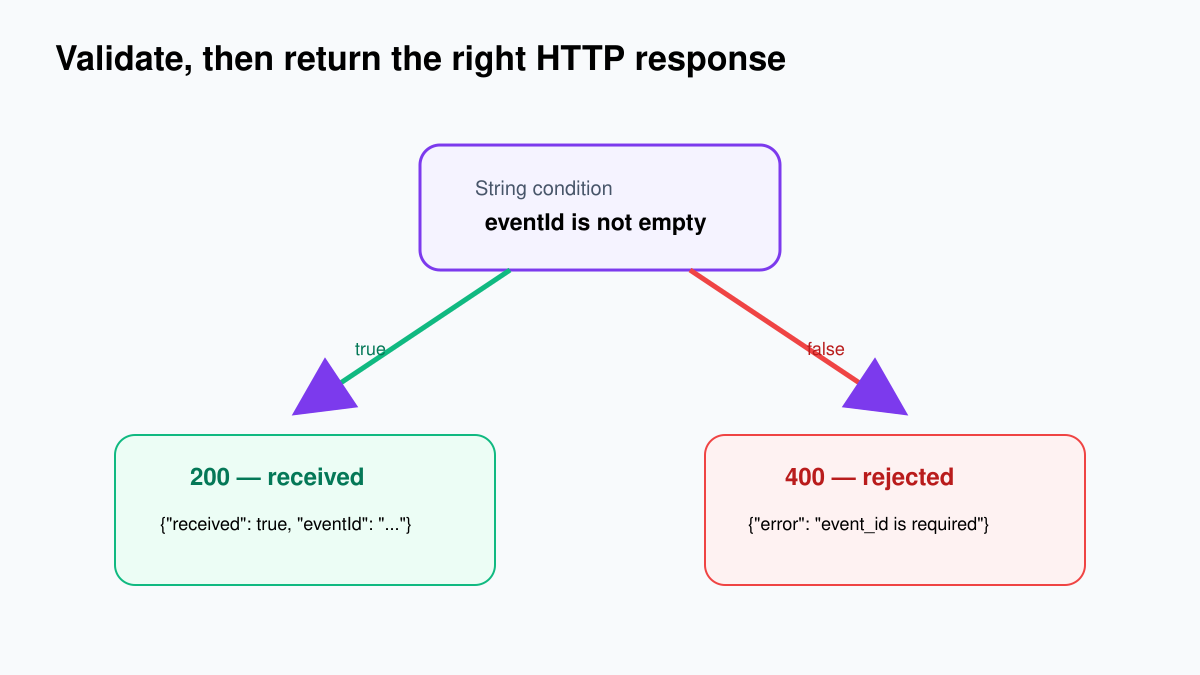
Add an If node after Normalise Event and rename it Has Event ID?.
- Choose the String condition type.
- Set Value 1 to the expression
{{ $json.eventId }}. - Select the comparison is not empty.
A request with event_id goes to the true branch. A request without it goes to false. This is basic validation, not full security, but it prevents the workflow from continuing with an unusable event.
Step 5: Return a controlled JSON response
Connect a Respond to Webhook node to the true output. Rename it Return Accepted.
- Set Respond With to JSON.
- In Response Body, enter:
{
  "received": true,
  "eventId": "{{ $json.eventId }}"
}
Under Options, set Response Code to 200. You could use 202 Accepted for asynchronous processing, but 200 keeps this practice workflow easy to test.
Connect another Respond to Webhook node to the false output. Rename it Return Bad Request and configure:
{
  "received": false,
  "error": "event_id is required"
}
Set this node’s Response Code to 400.
Step 6: Test both outcomes
Click Listen for Test Event again and resend the original curl command. Expected response:
{"received":true,"eventId":"evt_1001"}Now send a request without event_id:
curl -i -X POST "YOUR_TEST_WEBHOOK_URL" \
  -H "Content-Type: application/json" \
  -d '{"event_type":"order.created","customer_id":"cus_42","amount":129.90,"currency":"USD"}'
The -i option displays the HTTP status. Expected result: HTTP 400 and the JSON error message.
Move from the Test URL to production
- Save the workflow.
- Publish or activate it.
- Open the Webhook node and select Production URL.
- Copy that URL into the sending application.
- Send one controlled live test.
- Open the workflow’s Executions tab to inspect the production run.
The production request will not automatically display on the editor canvas like a waiting test request. Look in Executions. And yes, the Test URL and Production URL are different—copying the test address into a live service is probably the most common webhook setup mistake.
Choose the correct response mode
The Webhook node offers several response modes. They solve different problems; choosing one casually can leave a sender waiting or expose more data than intended.
| Respond mode | Use it when | Main caution |
|---|---|---|
| Immediately | The sender only needs quick acknowledgement. | It does not return the result of later processing. |
| When Last Node Finishes | The last node’s output is exactly the response you want. | A slow workflow keeps the caller waiting. |
| Using Respond to Webhook | You need a deliberate status code, body or branch-specific response. | Every possible route must reach an appropriate response. |
| Streaming | A compatible AI or streaming node sends data progressively. | Both the trigger and downstream nodes must support streaming. |
For business integrations, the explicit Respond to Webhook pattern is often easiest to reason about. The workflow shows exactly which branch returned 200, 400 or another status. Remember that the response node runs once and uses the first incoming item unless you deliberately aggregate or choose an all-items response option.
Secure the endpoint before real data arrives
For a real integration, return to the Webhook node and replace Authentication: None with the strongest method supported by the sender:
- Header Auth: good when you control both systems and can send a secret header.
- Basic Auth: simple, but use it only over HTTPS.
- JWT Auth: useful when the sender can issue and sign compatible tokens.
- Provider signature: when Stripe, GitHub or another service signs payloads, verify the signature exactly as its own documentation specifies. Some schemes require the raw request body.
n8n’s Webhook node also supports an IP allowlist. Treat that as an additional control, not a substitute for authentication. Do not put long-lived secrets in the query string; URLs often appear in logs and browser history.
The default maximum webhook payload is 16 MB according to n8n’s current documentation. Large documents, videos and bulk exports should normally go to object storage first; send n8n a secure file reference rather than forcing a huge binary payload through the trigger. Self-hosted administrators can change the limit, but increasing it also changes memory and abuse risk.
Prevent duplicate business actions
Webhook providers retry. Networks time out. A sender may not receive your response even when n8n completed the workflow. Therefore evt_1001 can arrive twice.
Before sending an email, creating an invoice or changing a customer record, store the event ID in a database or data table with a unique constraint. The logic should be:
- Look up
eventId. - If it already exists, return success without repeating the action.
- If it does not exist, reserve or insert it.
- Perform the business action.
- Store the final status and execution ID.
This is called idempotency. It is not fancy architecture—it is how you stop one payment event from creating two records.
Production checklist
- The external system uses the Production URL, not the Test URL.
- The workflow is published or active.
- The sender uses POST and
Content-Type: application/json. - Authentication or signature verification runs before business logic.
- Only trusted fields continue after Normalise Event.
- Missing required fields return a clear 4xx response.
- Every branch either responds or deliberately acknowledges immediately.
- Event IDs prevent duplicate business actions.
- Logs avoid storing full secrets or unnecessary personal data.
- A failed execution produces an alert containing the workflow and execution ID.
Troubleshooting in the right order
No execution appears
The request did not reach this workflow. Check the exact URL, HTTP method, test-listening state, workflow activation, DNS, firewall and reverse-proxy route.
The workflow runs, but fields are undefined
Open the Webhook output and inspect the JSON. For a JSON POST, values usually sit under body. Correct the expression path and spelling.
The sender receives “Workflow got started”
The Webhook node is probably set to Respond Immediately. Change Respond to Using ‘Respond to Webhook’ Node.
The request waits and then times out
Make sure every possible branch reaches a Respond to Webhook node. For long processing, acknowledge quickly and continue asynchronously instead of keeping the sender waiting.
Production works internally but shows the wrong domain
On a self-hosted instance behind a reverse proxy, configure n8n’s public webhook/base URL and forwarded headers according to the current hosting documentation. Do not hard-code internal container addresses into external services.