This n8n workflow tutorial starts with the one idea that makes everything easier: stop looking at the boxes and start looking at the data. That sounds almost too simple, I know. But it is the difference between dragging nodes around and actually understanding why a workflow works—or why it suddenly doesn’t.
In this beginner exercise, you’ll build a four-node workflow from scratch. It creates a sample customer, calculates annual spend with an expression, and sends the item down a true or false branch. No external account or API key is needed, so you can focus on the three ideas that matter most: nodes, items and expressions.
What an n8n workflow is actually doing
A workflow is a chain of nodes. A trigger starts the run. Every node after that receives data, does something with it, and passes data forward. The canvas shows the route; the execution data shows what really happened.
n8n normally passes data as an array of items. Each item contains a json object. You do not need to memorise that language yet. Just remember this practical rule: if the previous node produces one customer, the next node receives one item. If it produces 20 customers, the next node usually runs against 20 items.
Table view and JSON view are the same data
After a node runs, n8n may show its output as a table, JSON or a schema. These are different views of the same result. Table view is comfortable when every item has similar fields. JSON view is better when you need to see nested objects, arrays, missing values or the exact data type.
When something looks wrong later, click the previous node and inspect its output before changing expressions at random. Ask three questions: Does the field exist? Is its name spelled exactly the same? Is it a number, Boolean or string? That tiny habit solves a surprising number of n8n problems.
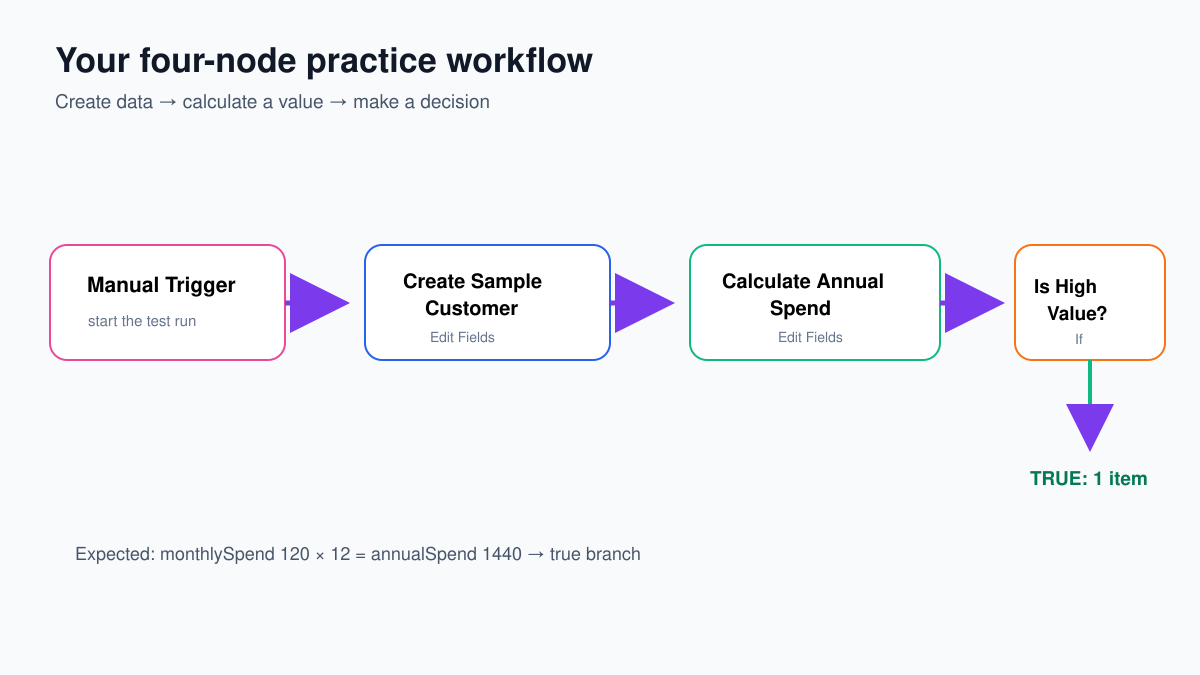
Step 1: Add Manual Trigger
- Open n8n and click Create Workflow or New Workflow.
- Rename it Customer Value Practice.
- Click Add first step.
- Search for Manual Trigger.
- Select Trigger manually or Manual Trigger, depending on the label in your n8n version.
Manual Trigger starts only when you click Execute Workflow. That makes it ideal for learning and testing. It does not wait for a webhook, a schedule or a new row in another app.
Click Execute step if that button is visible. The output may look empty, and that is fine. The trigger has started the run, but we have not created any useful fields yet.
Step 2: Create a sample customer with Edit Fields
- Click the + to the right of Manual Trigger.
- Search for Edit Fields.
- Select Edit Fields (Set).
- Rename the node Create Sample Customer.
- Set Mode to Manual Mapping.
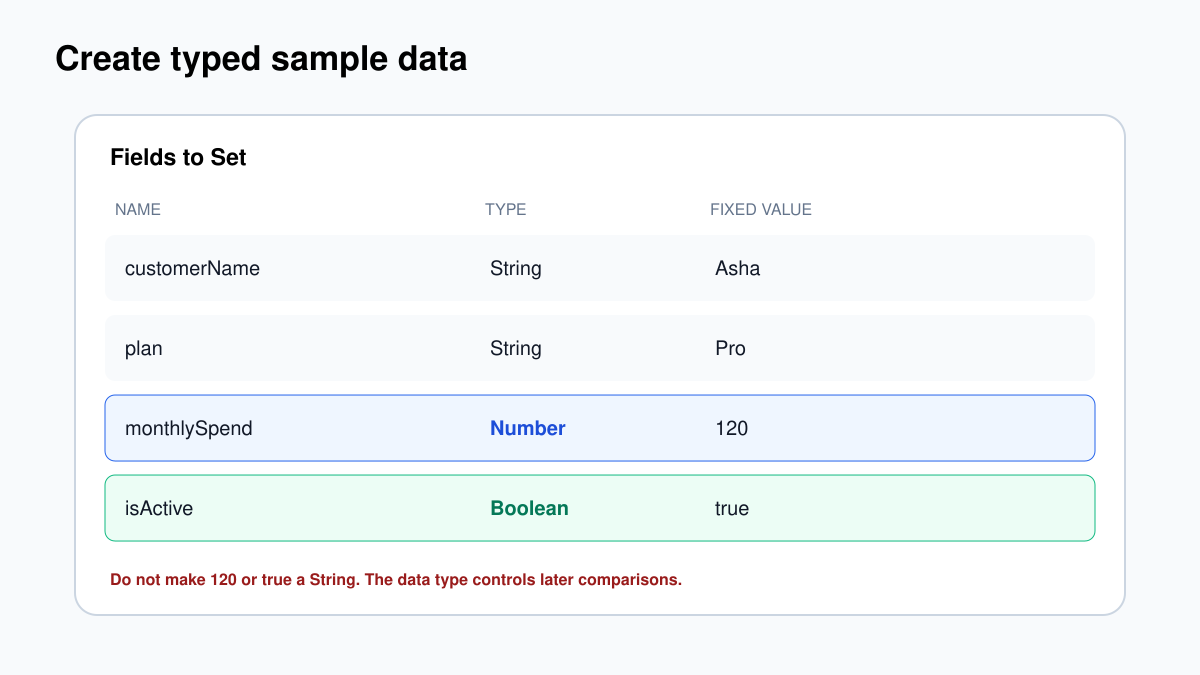
- Under Fields to Set, click Add Field four times and enter the values below.
| Field name | Type | Value |
|---|---|---|
customerName |
String | Asha |
plan |
String | Pro |
monthlySpend |
Number | 120 |
isActive |
Boolean | true |
Keep these values in Fixed mode. A fixed value is literally what you type: the name is Asha, the plan is Pro, and the monthly spend is 120. We are creating predictable test data on purpose.
Now click Execute step. In the output panel, switch to JSON if needed. You should see something close to this:
{
  "customerName": "Asha",
  "plan": "Pro",
  "monthlySpend": 120,
  "isActive": true
}
Notice that 120 has no quotation marks and true has no quotation marks. That matters. If you accidentally choose String, n8n stores "120" as text rather than a number, which can break numeric comparisons later.
What “Keep Only Set Fields” changes
Our Manual Trigger does not provide useful business data, so you will not notice much difference yet. In a real workflow, however, the previous node might supply 30 fields. If you enable Keep Only Set Fields, n8n discards every field you did not explicitly set. That is useful when cleaning data before sending it somewhere else, but dangerous when you still need an ID, email address or timestamp later.
A safe beginner rule is to keep all input fields until the workflow works. Then remove unnecessary fields deliberately.
Step 3: Calculate annual spend with an expression
Add a second Edit Fields node after Create Sample Customer. Rename it Calculate Annual Spend.
- Keep Mode on Manual Mapping.
- Click Add Field.
- Name the field
annualSpend. - Choose the Number type.
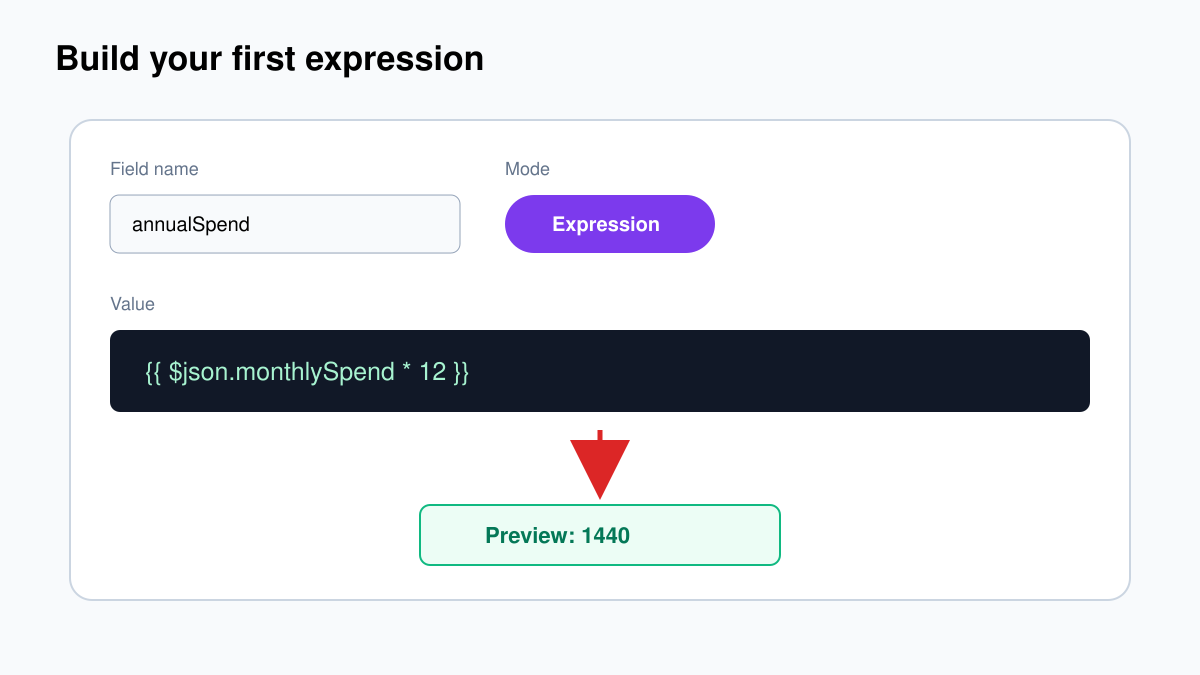
- In the Value field, switch from Fixed to Expression.
- Paste this expression:
{{ $json.monthlySpend * 12 }}Read it from left to right. $json means the current item’s JSON data. .monthlySpend selects the field produced by the previous node. * 12 multiplies that value by 12.
You can also write the field lookup with brackets:
{{ $json["monthlySpend"] * 12 }}Both versions work for this field. Bracket notation becomes especially useful when a field name contains a space, for example {{ $json["Monthly Spend"] }}. Still, clean names such as monthlySpend are easier to reuse and debug.
Under Include in Output, keep All Input Fields so the original customer fields remain in the output. If your version shows Keep Only Set Fields instead, leave it off. Turning it on would discard the original fields and keep only annualSpend.
Click Execute step. The expected output is:
{
  "customerName": "Asha",
  "plan": "Pro",
  "monthlySpend": 120,
  "isActive": true,
  "annualSpend": 1440
}
What if the expression turns red?
Run the previous node first. Expressions can preview data only when n8n has input from an earlier execution or pinned data. Also check the spelling carefully: monthlySpend and monthlyspend are different field names.
Step 4: Split the workflow with an If node
Now we’ll ask a real workflow question: is this customer worth at least $1,000 per year?
- Click the + after Calculate Annual Spend.
- Search for If and add the If node.
- Rename it Is High Value?.
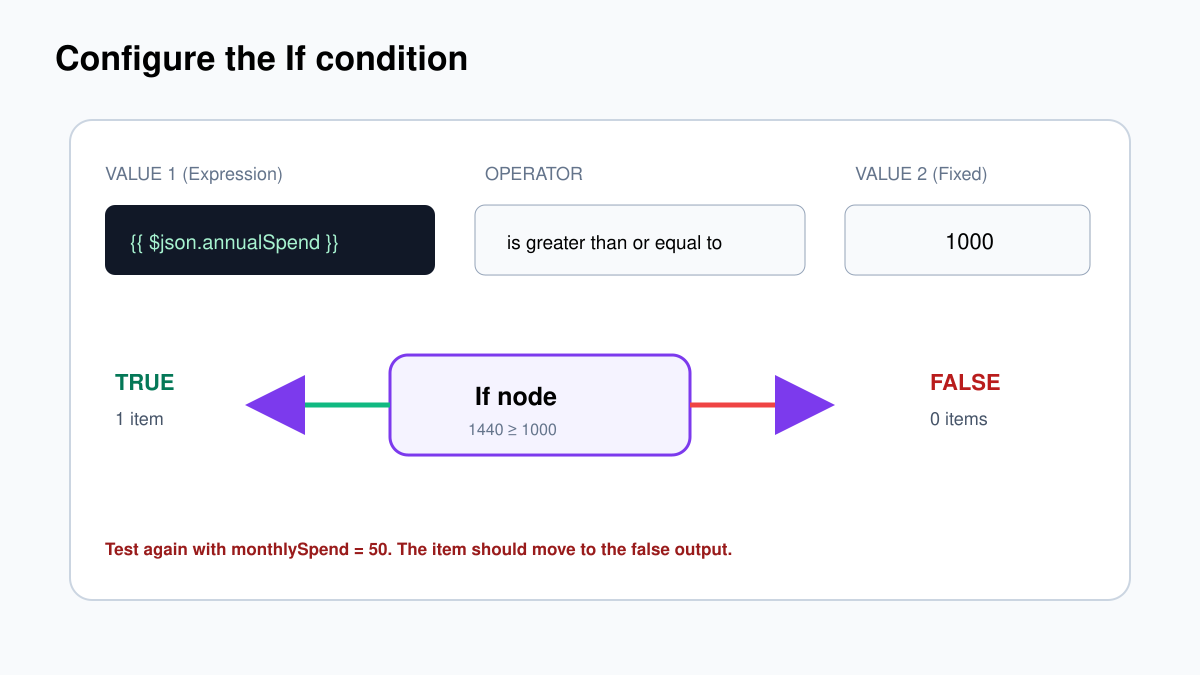
- Under Conditions, choose the Number data type.
- For the first value, switch to Expression and enter
{{ $json.annualSpend }}. - Choose is greater than or equal to.
- For the second value, keep Fixed mode and enter
1000.
Click Execute step. The node has two outputs: true and false. Because 1,440 is greater than or equal to 1,000, the one item should appear on the true output. The false output should contain zero items.
Step 5: Prove both branches work
A beginner mistake is testing only the result you expect. Let’s deliberately force the other branch.
- Open Create Sample Customer.
- Change
monthlySpendfrom120to50. - Click Execute Workflow to run the complete workflow from the trigger.
The annual spend is now 600. The If node should send the item to false. Change monthlySpend back to 120 and run it one more time; the item should return to true.
| monthlySpend | annualSpend | Expected branch |
|---|---|---|
| 120 | 1,440 | true |
| 50 | 600 | false |
| 83.33 | 999.96 | false |
| 100 | 1,200 | true |
Fixed values versus expressions
Here’s the simplest way to decide which mode to use:
- Use Fixed when the value should stay the same every run: a country code, a threshold, a status label or an email subject.
- Use Expression when the value depends on incoming data, another node, the current date or a calculation.
In our workflow, 1000 is fixed because it is the rule. {{ $json.annualSpend }} is an expression because it changes with each customer.
Common mistakes and the fix
The output says “undefined”
The field does not exist on the current item, or its spelling/capitalisation is different. Open the previous node’s JSON output and copy the exact field name.
The If node compares text instead of numbers
Go back to the first Edit Fields node and set monthlySpend to Number, not String. Then confirm annualSpend is also a Number field.
The second Edit Fields node removed the original fields
Set Include in Output to All Input Fields. On older interfaces, turn off Keep Only Set Fields.
Only the last node ran
Execute step runs one selected node using available input. Execute Workflow starts from the trigger and follows the complete connected path. Use the full workflow run when checking branching behaviour.
The true output is empty
Open the If node’s input and check the actual annualSpend value. With monthlySpend 120, it should be 1440. Also confirm the operator is “greater than or equal to,” not “less than.”
What you have learned
You now know more than someone who has merely imported a complicated template. You created typed data, inspected JSON, used an expression, preserved input fields, configured a numeric condition, and verified both branches. Those same moves appear in invoice approvals, lead routing, notification systems and AI workflows.
Before moving on, duplicate this workflow and experiment. Add a field called discountRate. Create an expression that calculates a discounted annual total. Then change the If condition. Breaking a tiny practice workflow is one of the fastest ways to understand n8n—because you can always see exactly what changed.
Official references
n8n occasionally adjusts labels and panel layout. The node behaviour, data types and comparisons in this tutorial follow the current official documentation.