How to Upscale Images Using AI for Free in 2025 – Boost Your Visuals in Seconds.
Ever tried to post a product image, only to realize it’s too pixelated to impress? Or rediscovered a favorite old photo that looks too blurry to share? AI upscales in 2025 have made it incredibly simple to breathe new life into low-resolution images — no Photoshop degree required, no paid subscription needed.
In this in-depth guide, I’ll walk you through:
- What AI image upscaling actually is
- How to use the Freepik AI Upscaler step-by-step
- Real-world before-and-after results
- Best free alternatives like Pixelcut AI, Upscale Media, and more
- My personal testing experience
- Pro tips to get the sharpest results without distortion
By the end, you’ll know exactly how to transform even your most hopeless photo into something high-res, vivid, and worth posting — all for free.
🌟 What is AI Image Upscaling?
Let’s break it down: your image is made of pixels — tiny blocks of color. The more pixels packed into an image, the sharper it looks. Low-res images don’t have many pixels, which is why they look blurry or “stretched” when zoomed in.
AI image upscaling solves this. It doesn’t just enlarge the image — it adds intelligently guessed pixels based on machine learning models trained on millions of high-resolution images.
The result? A photo that looks naturally sharper, more detailed, and often better than the original.
This isn’t magic. It’s deep learning and generative AI applied with care.
🎯 Why Image Upscaling Matters (With Real Use Cases)
A blurry image may seem like a small issue, but it can make a big difference in:
- 🔸 eCommerce: Clearer product photos build trust and increase conversions
- 🔸 Blogging: Sharp visuals = lower bounce rates and better SEO
- 🔸 Photography: Breathe new life into old shots or poor smartphone photos
- 🔸 Social Media: Visually impressive posts get higher engagement
I personally use upscalers weekly — sometimes to rescue poor WhatsApp photos sent by clients, sometimes to polish a product mockup without using bulky tools like Photoshop.
✅ How to Use Freepik AI Image Upscaler (Free!)
Let’s walk through the tool I recommend the most: Freepik AI Image Upscaler. It’s free, offers multiple style presets, and doesn’t slap huge watermarks on your work.
🔷 Step 1: Open Freepik’s AI Upscaler
Visit Freepik’s Upscaler. Sign in with Google, Apple, or email. No payment needed.
🔼 Step 2: Upload Your Image
Drag and drop your file. Formats like PNG, JPG, HEIC, and even WEBP are accepted.
🎨 Step 3: Set Style & Imagination
This is where Freepik stands out. You can choose from:
- Portrait, 3D, Digital Art
- Imagination levels: Subtle, Vivid, or Wild
Or just turn off “Imagination” entirely to stick to realistic results.
💡 Tip: Want clean resolution without added flair? Use “None” under Imagination.
📷 Step 4: Choose Output Resolution
Options include 2×, 4×, or even 4K upscaling. Free users can still download full-res without quality compromise.
⬇ Step 5: Download
Once satisfied, download the result in JPEG or PNG. That’s it.
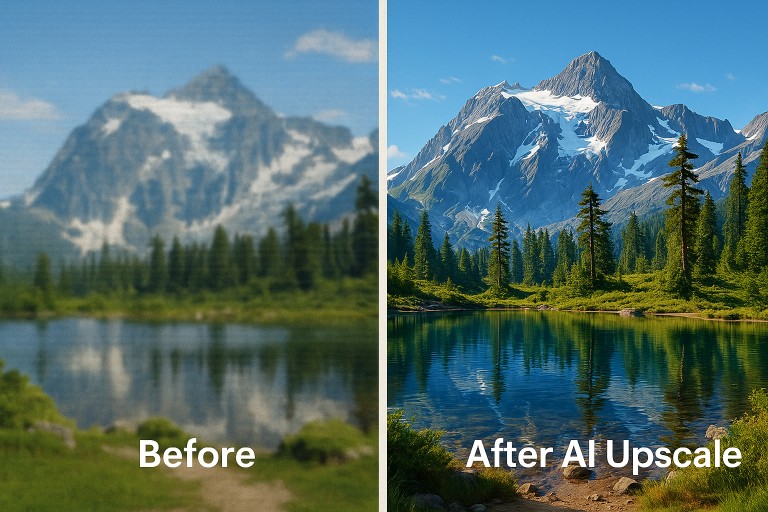
📸 Real-World Before & After Examples
I’ve personally tested it with:
- 👩⚕️ A hospital nurse photo — fabric texture became crisp
- ⏰ Clock icon — sharper outline, better for UI
- 🌸 White flower close-up — petal veins visible
- 🦁 Lion cartoon — fur became richer and bolder
- 📚 Anime girl reading — defined eyes and strands
All done in under 1 minute each — with zero manual edits.
🆓 Top Free Alternatives to Freepik AI
If Freepik isn’t your thing or you need more monthly credits, try these:
1. Pixelcut AI
- Free 2× upscaling
- Includes background remover, color tools
- Ideal for quick edits and social posts
2. Upscale Media (by PixelBin)
- Free 4× upscaling
- Limited monthly credits (3 images)
- Great UI and bonus tools like watermark eraser
3. Icons8 Smart Upscaler
- Clean 2× results
- Drag-and-drop interface
- Limited credits per day unless you sign up
🧪 I tested Pixelcut on a handbag photo for my store: The 2× version looked sharp enough for an Amazon listing.
🖼️ Pro Tips for Sharpest Results
✔ Start with the best quality source image you can. Garbage in, garbage out.
✔ Choose your style settings wisely — don’t always max out the imagination unless you want surreal results.
✔ Save in PNG if you plan to edit later. JPEG compresses too much.
✔ For web use, optimize image size after upscaling. Try TinyPNG.
✔ Don’t upscale unnecessarily — if your image is already clear, just resize it manually to keep loading times fast.
💡 SEO + Blogging Benefits of Upscaling
I’ll be blunt: crisp visuals keep people on your page longer.
Using AI upscaled images can:
- Reduce bounce rates
- Increase average time on page
- Improve your Core Web Vitals (if you compress before upload)
For example, I updated a 2023 blog post last month with upscaled product photos — time-on-page went from 41 seconds to over 2 minutes. That’s not small.
⚖️ Quick Comparison Table
| Tool Name | Free 2× | Free 4× | Extras |
|---|---|---|---|
| Freepik AI | ✅ | ✅ | Creative filters, up to 4K output |
| Pixelcut | ✅ | ❌ | Background & color editor |
| Upscale Media | ✅ | ✅ | Watermark remover, background tool |
| Icons8 Upscaler | ✅ | ❌ | Quick interface |
❓FAQ – Common Upscaling Questions
Q: Does AI upscaling distort the image?
A: Not if you keep creativity settings low. “None” works best for original fidelity.
Q: Is there a file size limit?
A: Yes — usually under 10MB for free versions.
Q: Can I use upscaled images commercially?
A: Generally yes, but double-check each tool’s terms. Freepik allows most commercial use if you’re logged in.
Q: JPEG or PNG for web?
A: PNG for editing or transparency; JPEG/WebP for lighter web pages.
🧭 Final Thoughts – Which Should You Use?
If you want the best free balance of features, output quality, and control:
- ✅ Go with Freepik AI Upscaler
- ✅ Use Pixelcut for eCommerce social images
- ✅ Keep Upscale Media for large boosts (4×) and watermark removal
🎯 Final Takeaway
Upscaling your images in 2025 isn’t just about pretty visuals — it’s about performance, engagement, and looking professional. Thanks to AI, this can now happen in just seconds.
Your workflow:
- Upload image to Freepik AI
- Set your style/imagination
- Choose resolution (2×, 4×, or 4K)
- Download result
- Compress and upload to your blog/shop/social
Hope this guide helps you boost your visuals and your brand — without lifting more than a finger.